This support document outlines the process of using the Schema App Highlighter to author and deploy markup at scale to similarly templated pages across your website.
TABLE OF CONTENTS
- Part 1: Create and Name a Highlighter Template
- Part 2: Tag First Page
- Part 3: Create Page Set
- Part 4: Add URL Examples to Review Deployment Targeting
- Part 5: Review Highlighter Targeting on Additional URLs
Note: In 2025, Schema App deprecated our Highlighter V1 and replaced it with the more responsive Highlighter Extension. Some of training videos and screenshots may reference the V1 user interface as we work to update our training documentation. Although the tool used to create a Highlighter template has changed, the functionality of the Highlighter has remained the same. Reach out to support@schemaapp.com if you need any clarification or guidance.
Part 1: Create and Name a Highlighter Template
Training Objective: Select a page, the most appropriate class and a reference name.
For more detail, please review the in-depth support article:
How To: Create and Name a Template
For the smoothest experience, make sure you're legged into the Highlighter Extension.
Navigate to the Schema App Highlighter Overview Page in the App and click New Template. Paste in the URL of a page you want to mark up. The URL you pick should be exemplary of the pageset you're marking up, meaning that is should have all or as many of the standard components as possible..
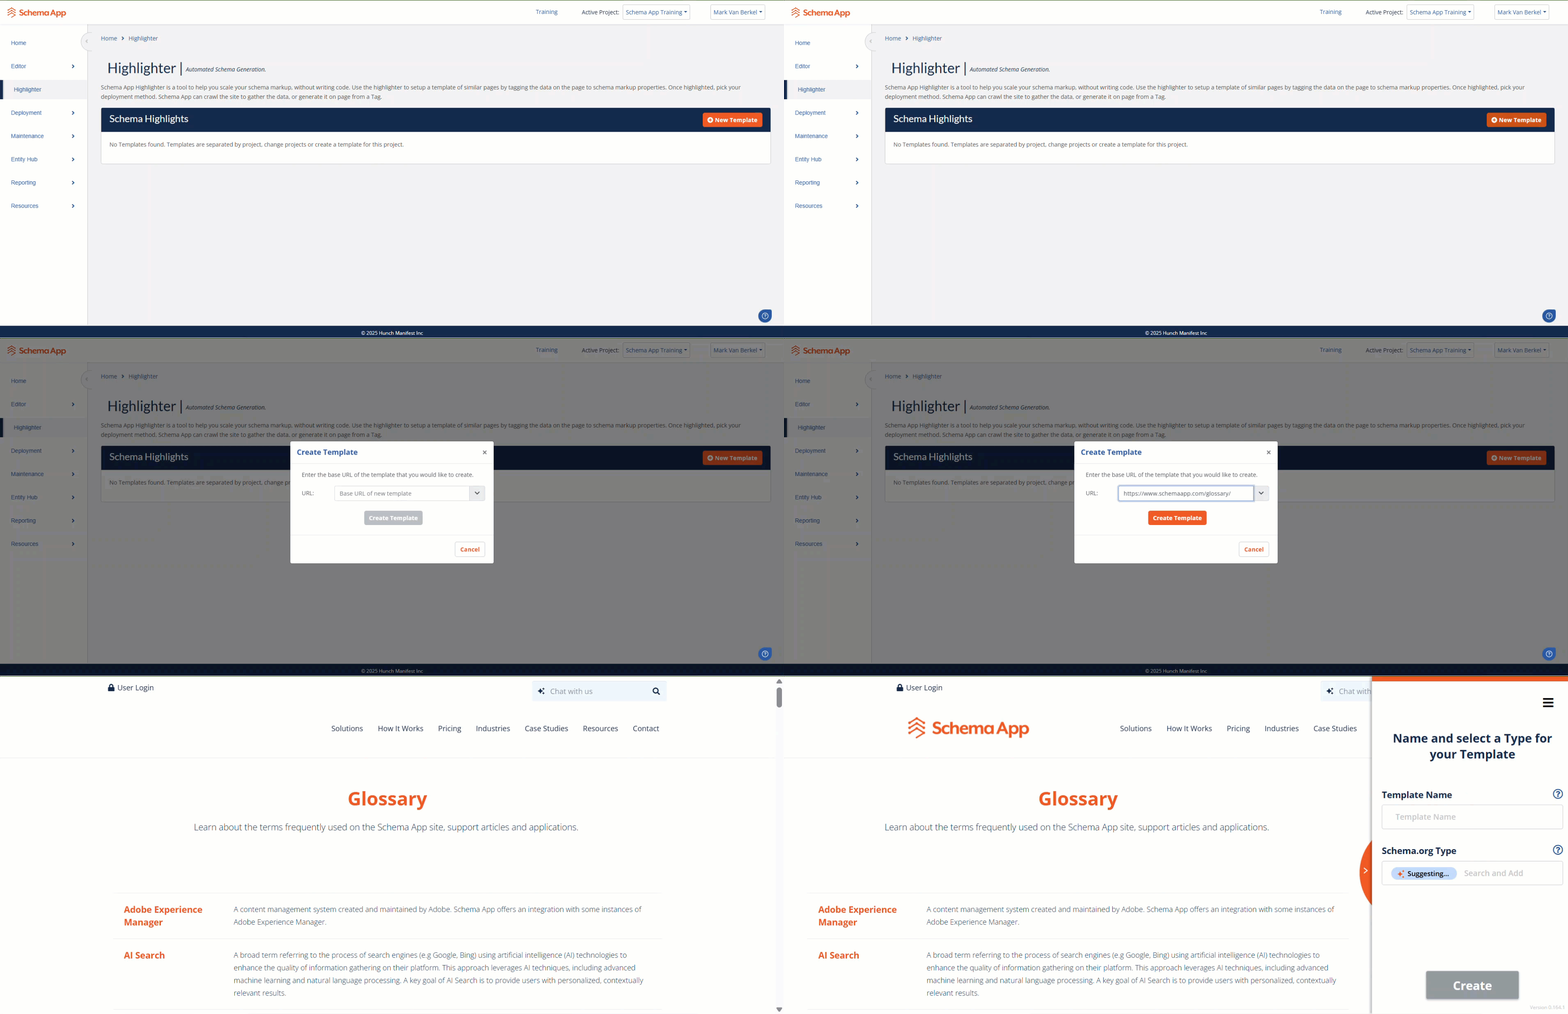
When the template opens in a new tab, you will be prompted to define a template Name and a Class/Type. There may be an AI type suggestion that you can accept or ignore. Choose a label that will be descriptive and useful for differentiating the tempate from others.

Note: Multi-typing is a strategy you can use when an entity is described by more than one Schema.org type. For example, a Book that is being sold on a website can be accurately described as a Book and a Product. See this support document for more information.
From here you'll start to define highlights on the exemplary first page.
Part 2: Tag First Page
Training Objective: Tag your chosen templated page with schema markup using the 4 functionalities of the Schema App Highlighter. Complete the full authoring flow and proceed to defining a page set.
Four Functionalities Available
There is a good chance that you won’t be able to use the same method to tag all of the content on your page, depending on the type of content and its structure. The Highlighter contains different functionalities for targeting different types of content.
We recommend that you consider each option in the following order:
- Functionality 1: Tag content on a page
- Functionality 2: Add a Sub-Template
- Functionality 3: Link Existing Data Items
- Functionality 4: Add Fixed Property
Functionality 1: Tag content on a page
This dynamic functionality maps on-page content to Schema.org Types and properties. Hover your cursor over the content on the page. An orange box will surround the content that can be targeted by the Highlighter.

For some properties you can end here (e.g. articleBody, description, inLanguage). However, for some highlights, you need to define additional information. For example, author~Person~name. The Schema App authoring tools will present you with suggested properties for specific Types. If you aren’t sure what to choose, we recommend that you go to “schema.org” to read the short definitions of the options.
Note: For information about recommended property paths for specific page types, see the Strategy and Best Practices folder.
Sometimes you select the wrong thing! That's ok! You can always widen the highlight (make the selection broader) or reselect the highlight. Both options are accessed through the Advanced Edit settings.

Functionality 2: Add a Sub-Template
Subtemplates are another dynamic highlighting option. They are used when there is a section within your page that contains content that repeats (e.g. a list of Articles).
Hover your cursor over one of the repeating components to select it. Make sure the green border box captures the entire repeating component. The following components should appear as greyed out boxes. You find it easier to use the "Expand Highlight Area", like in example below.

Define the property path, ending on the Type that describes the repeating component.
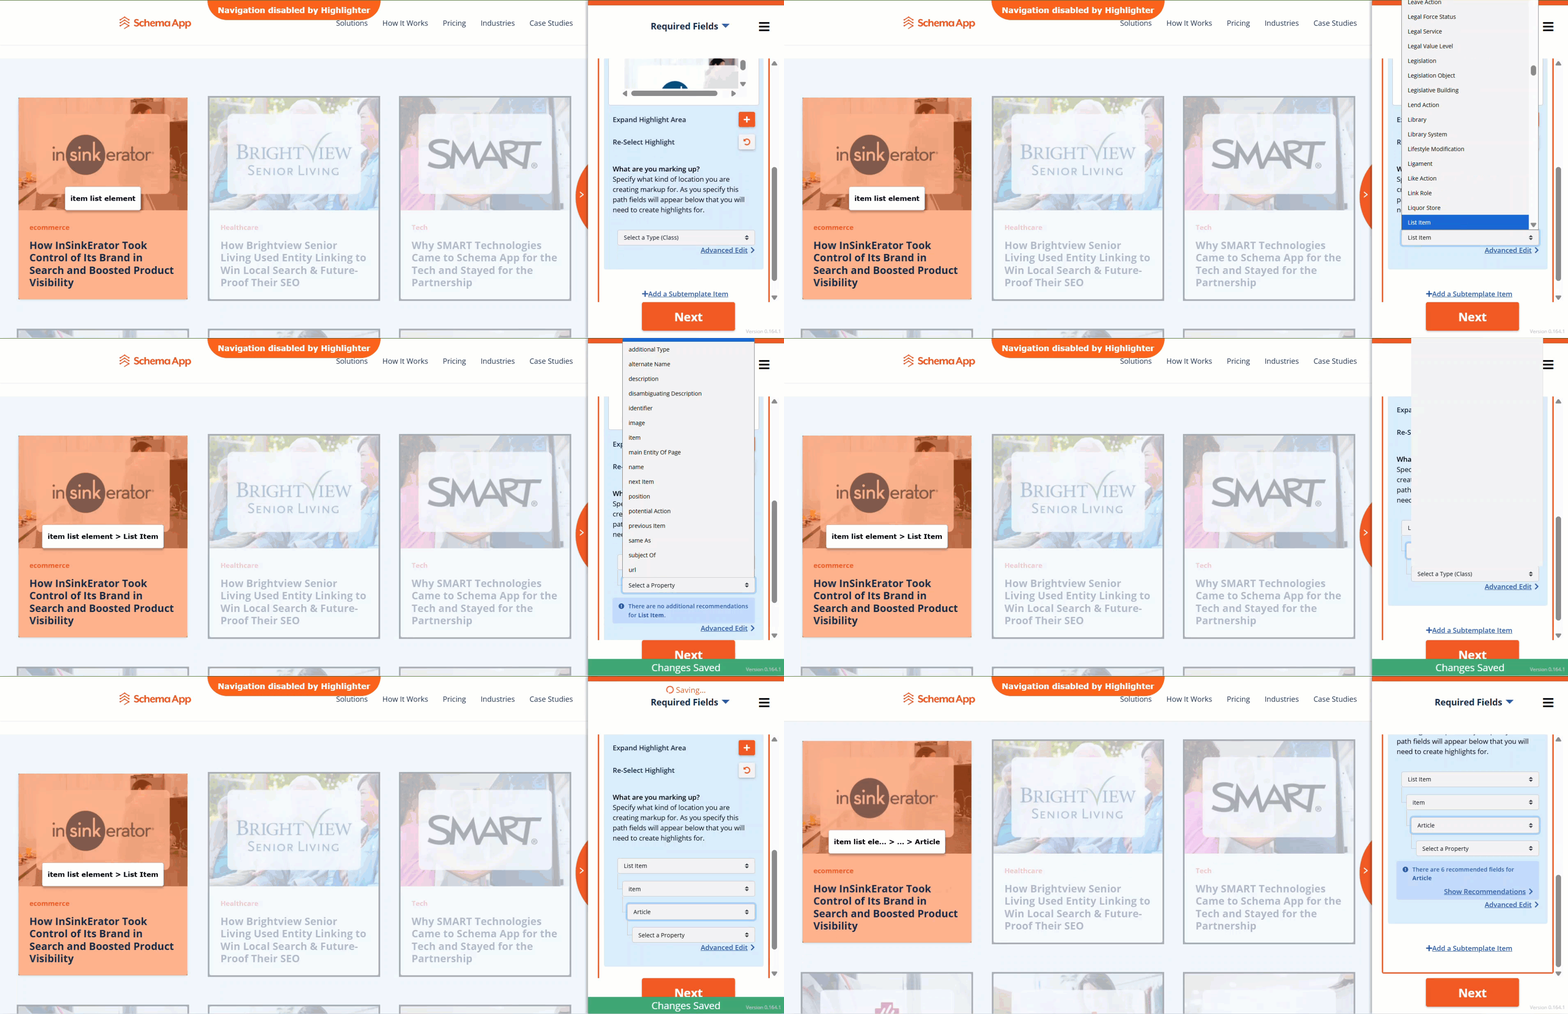
Add Subtemplate Highlights to capture specific pieces of content within the repeating component.
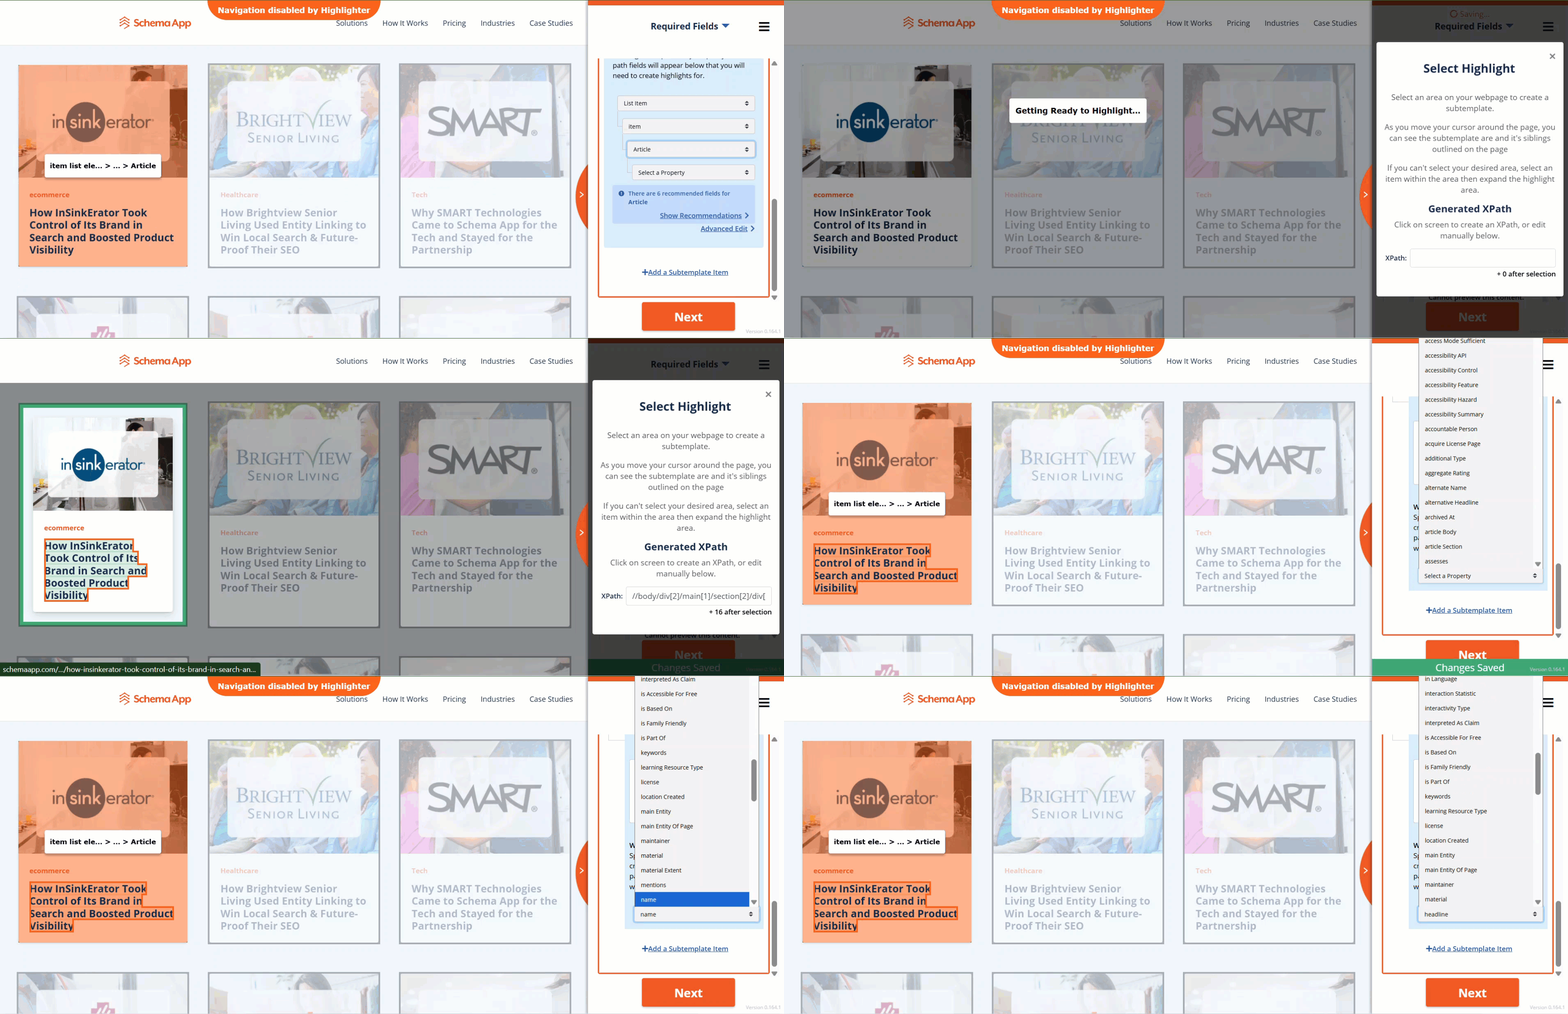
Functionality 3: Link Existing Data Items
Use the “Link Existing Data Items” functionality to reference a data items authored using the Schema App Editor. For example, you can connect an Organization to an Article as the publisher. Do not end the property path on a Type, end it on the property you want to connect the Editor data item to (e.g. publisher, or offeredBy).
Note: The data item that is linked will be applied to every URL the template deploys to. If you need to set conditions on a tag.
Search for the data item by name. Only Types that are expected for that property will appear.
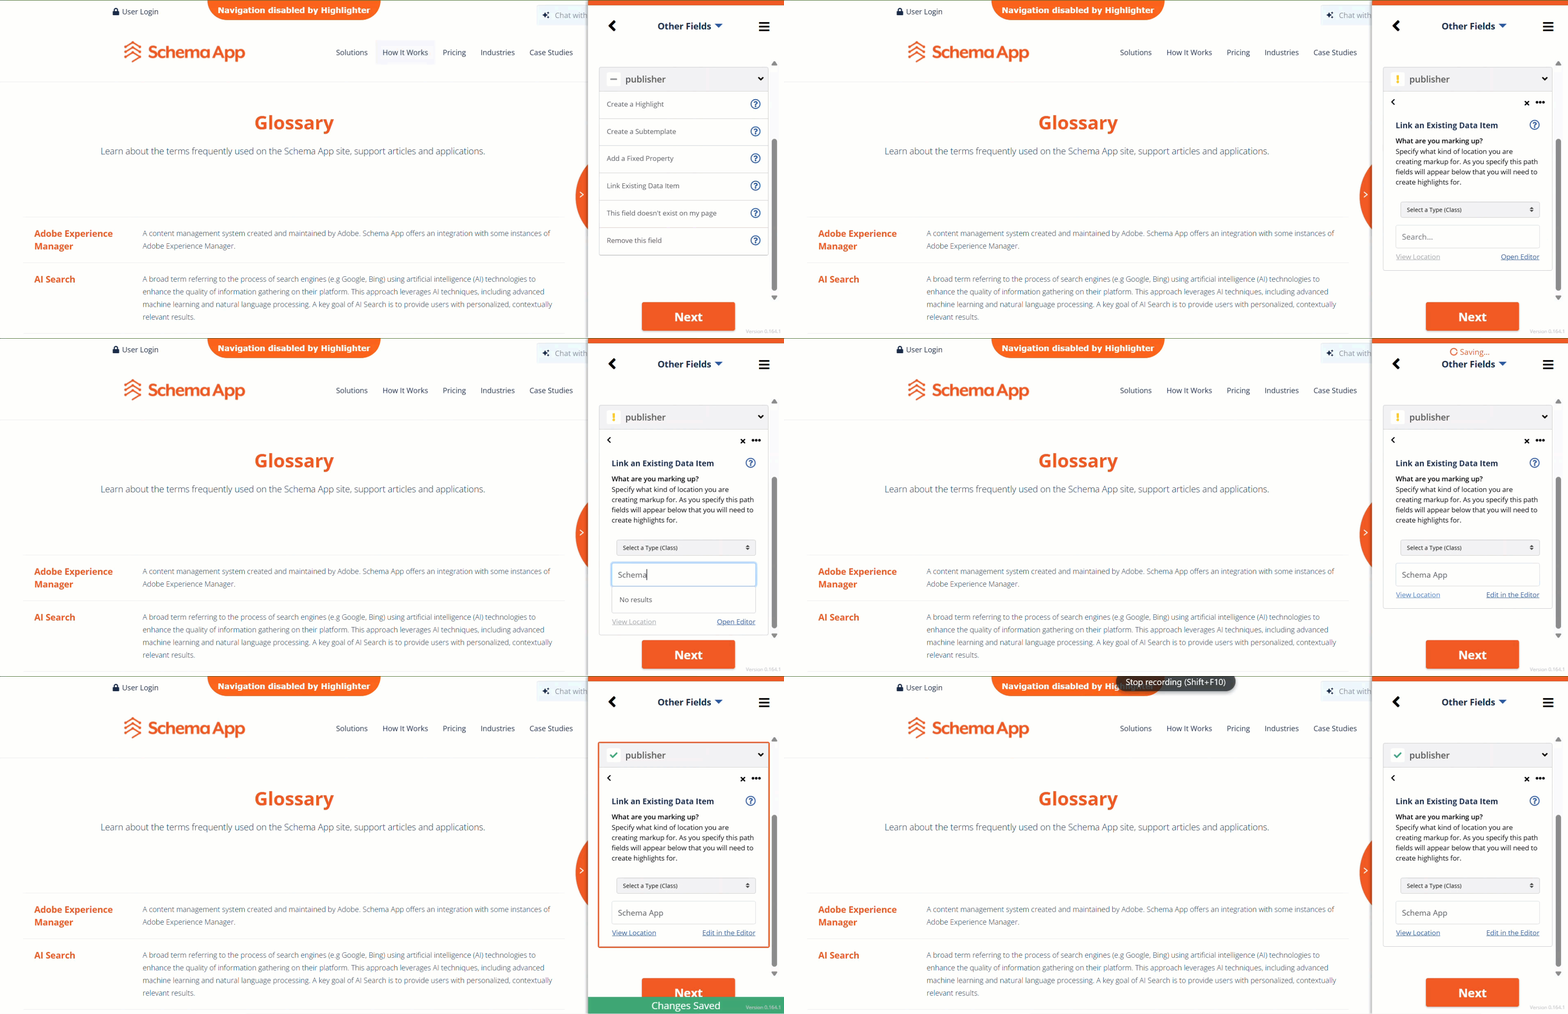
Functionality 4: Add Fixed Property
Use the “Add Fixed Property” to define text strings or URLs that are consistent across pages. For example, a standardized currency (CAD), a consistent language (fr-CA), a product that is always considered available (https://schema.org/InStock).
Required, Recommended, Optional: The Authoring Flow
The Schema App Highlighter will move you through three categories of highlights: Required, Recommended, and Other Fields. Required and Recommended fields are based on Google's documentation for rich result features. Other fields encompass all the other properties available under a particular Type.
A required or recommened property might have multiple highlights associated with it. For example, an Article has the recommended property for "author" where the Person might have a name, a description, and a URL.
Part 3: Create Page Set
Training Objective: Define the rules the Schema App Highlighter should use to deploy markup to all URLs in a pageset.
Now that you’ve highlighted your content, you want to tell the Schema App Highlighter which URLs to deploy the template to. There are three deployment options, each deployment option is a different method of defining the page set for your Template.
The 3 Deployment Options available:
- Deployment Option 1: List URLs
- Deployment Option 2: Define Pattern
- Deployment Option 3: Use Defined XPath
Deployment Option 1: List URLs
Add a list of URLs you want to deploy the template to. The URLs must match exactly the URLs you want to target, and the live URL must reflect the canonical URL of the page. This option is good for pagesets that won't change or grow over time. However, this option is not well suited for pagesets where net new URLs are added frequently.
How To: Define a List of URLs
- Paste in the list of URLs you want to target.
- Review & confirm the list of URLs
Note: The exemplary URL you used to author the highlights in Step 2 is not included by default in the list of URLs to deploy to. You must explicitly add it to the list of URLs. URLs that are targeted will have a green checkmark beside them in HX.
Deployment Option 2: Define a URL Pattern
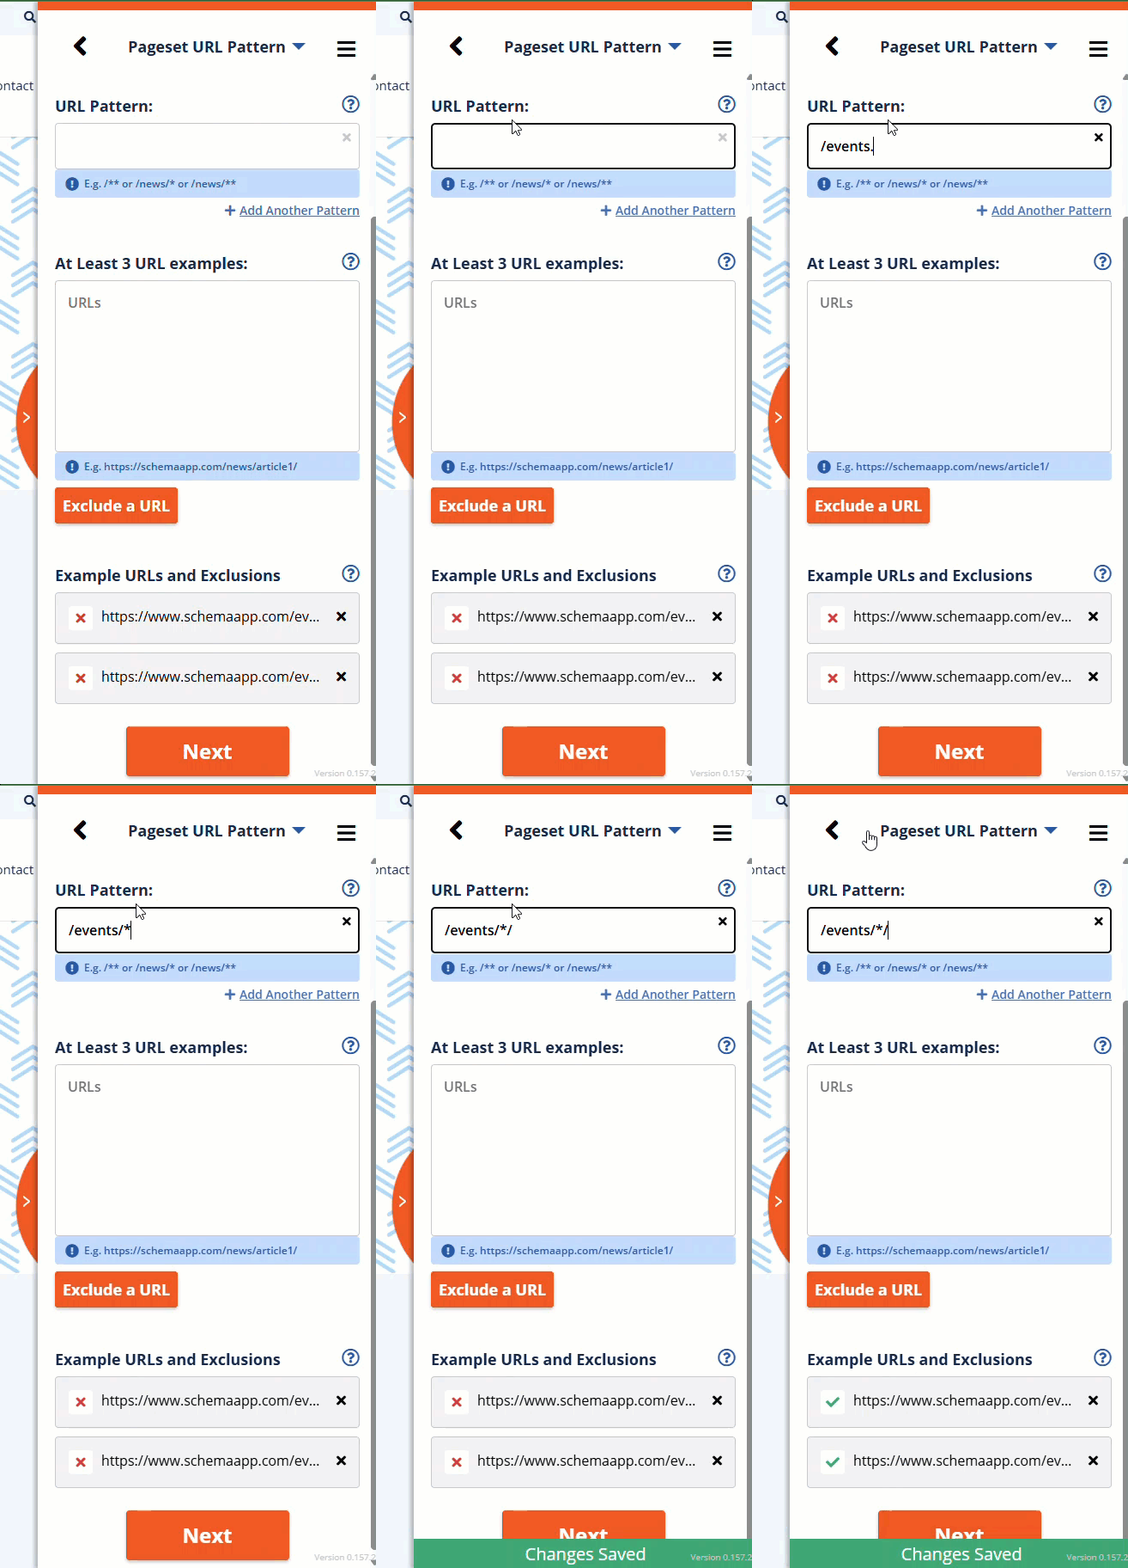
Add a URL pattern to define the pageset. This option allows you to define a URL segment pattern to define the page set. A URL pattern can be a combination of subdirectory folders, single wildcards, and double wildcards to balance specificity and flexibility.
Note: Do not include the domain (e.g. https://www.schemaapp.com/) in the URL pattern. This value is defined by the page-set.
| Pattern Type | Example | Purpose |
| Subdirectory Folder(s) | /support/solutions/articles/33000264972-schema-app-highlighter-training/ This example would only deploy to 1 URL. /support/solutions/articles/*/ This example would deploy to all URLs following the /articles/ subdirectory. The URLs would have to have a trailing slash. | The template must deploy to pages that follow this subdirectory pattern. |
| Single Wildcard | /schema-markup/*/ This example would target URLs nested one subdirectory under /schema-markup/. The URLs would have to have a trailing slash. | Indicates a variable for all URLs within a single subdirectory |
| Double Wildcard | /support/solutions/** This example would target all URLs under the /solutions/ subdirectory, even several folders deep. It would not matter whether the URL had a trailing slash or not. | Indicates a variable for all URLs & folders under a subdirectory. |
How to Add URL Patterns to a Pageset
- Select "Create a URL Pattern"
- Enter your URL pattern
- If you have more than one pattern, select "Add Another Pattern" and repeat step 2
- Paste at least three example URLs into the sample field and select "Add These URLs"
- Review the list of Example URLs and Exclusions to confirm that the URL patterns you added will target the example URLs you added in Step 4.
- Review whether your URL pattern matches the example URLs provided. A green checkmark indicates a successful match, a red X indicates a non-match, and an italicized E indicates a URL is excluded.
Option 3: XPath Match Requirement
Enter an XPath pattern that has a match on all pages you want to apply markup to. If a page has content that matches that XPath, then that page will receive markup from this template. XPaths are an excellent way to create pagsets when a site has a relatively flat site structure without highly differentiated URL subdirectories.
Note: If you are using an XPath pattern, be certain that it does not match on pages that you do not want to target with your template. This can sometimes be a process of trial and error
How to Add XPath Match Requirements to a Pageset
- Select "Choose Matching XPaths"
- Enter your XPath
- If you have more than one pattern, select "Add Another XPath" and repeat step 2
- Paste at least three example URLs into the sample field and select "Add These URLs"
- Review the list of Example URLs and Exclusions to confirm that the XPath you added will target the example URLs you added in Step 4.
- Review whether your XPath matches the example URLs provided. A green checkmark indicates a successful match, a red X indicates a non-match, and an italicized E indicates a URL is excluded.

For a helpful resource on XPaths, review this external support article.
Exclusion Patterns
Pageset exclusions are rules to define URLs that the template should not deploy to. Users can input a list of URLs, a URL pattern, or an XPath match to define an exclusion. Exclusions are only available when deploying via a URL Pattern or an XPath.
There are three methods for excluding URLs: a manual list of URLs, a URL pattern, or an XPath. Currently, only one exclusion method can be used at a time.
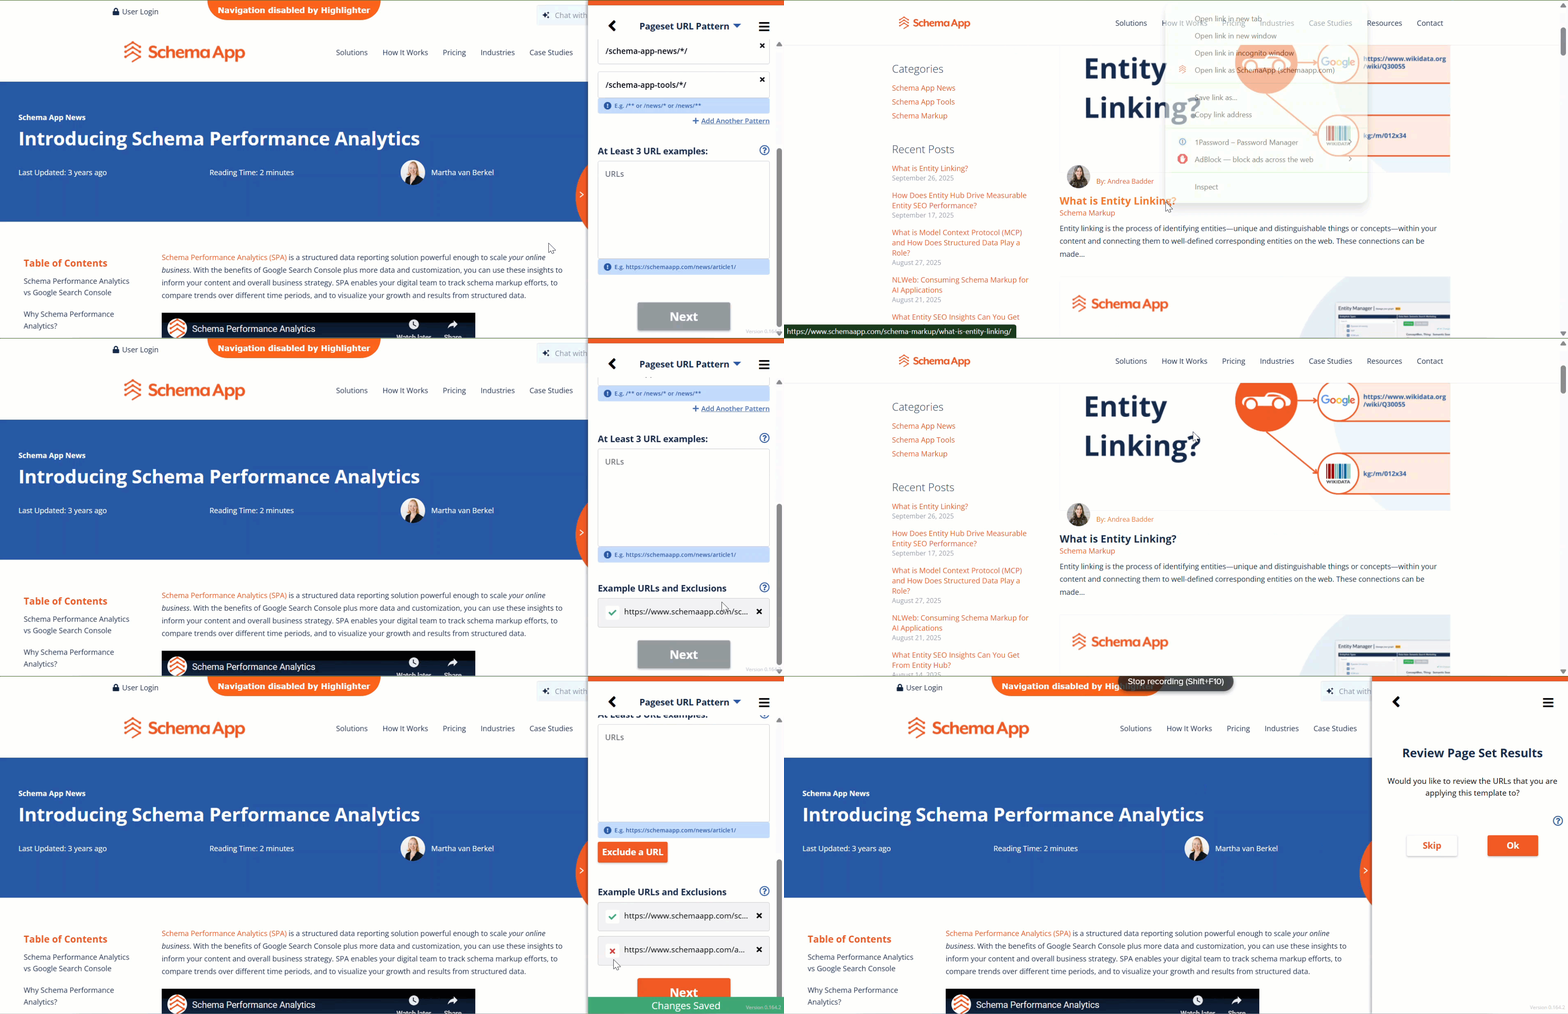
Part 4: Add URL Examples to Review Deployment Targeting
Training Objective: Use the "URL Example" field to assess whether your deployment pattern will target specific URLs.
When defining a deployment pattern, users have the opportunity to add URL Examples. There are two main reasons you would add a URL to the URL Examples
- To confirm that an example URL will not be targeted
- To confirm that a deployment rule will target an example URL
These URLs should also be used to Review Highlighter Targeting in Part 5.
Part 5: Review Highlighter Targeting on Additional URLs
Training Objective:Use the Review & View JSON-LD pages to ensure that the highlights map appropriately to the on-page content. This is a critical step before publishing the template to deploy at scale. Schema App recommends reviewing targeting on at least 3 URLs before publishing the template. On each URL, complete the following steps:
TABLE OF CONTENTS
- How To: Use the Review Page to Assess Targeting on Additional URLs
- How To: Use the JSON-LD Page to Assess Targeting on Additional URLs
- How To: Verification and Highlighter Mapping Validation Process
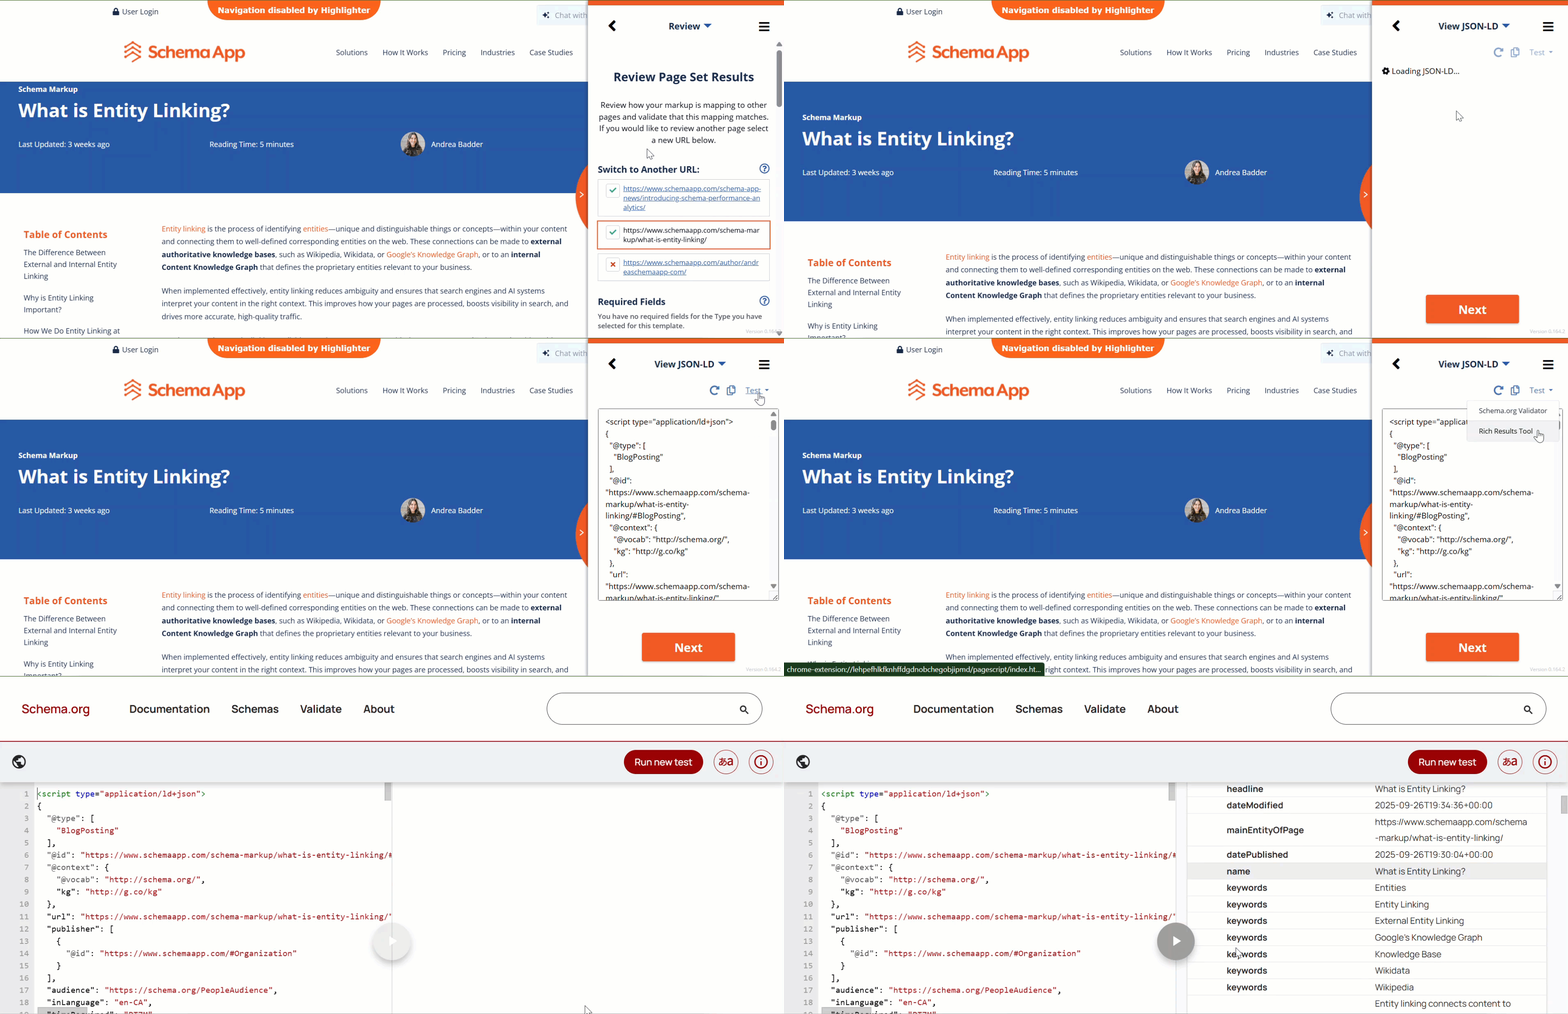
How To: Use the Review Page to Assess Targeting on Additional URLs
The Review Page will include all of the Highlights from the Required, Recommended and Other Fields sections.
You can scroll the list of highlights to see what should be included. Use the View JSON-LD page to assess mapping and eligibility. This will be an iterative process.

How To: Use the JSON-LD Page to Assess Targeting on Additional URLs
The JSON-LD page view can make it easier to review targeting and Rich Result Eligibility.
- Select "View JSON-:LD" from the drop down list to review the JSON-LD for a page you're assessing during the Review process.
- Select "Test" to export the JSON-LD to your testing tool of choice.
- Use the Rich Results Test to assess Rich Result eligibility.
- Use the Validator for a comprehansive review of how each highlight maps on-page content to Schema.org types and properties.
How To: Verification and Highlighter Mapping Validation Process
This section outlines considerations and suggestions for verifying targeting across different URLs. The Highlighter tool will attempt to identify components that contain specific kinds of information across each URL. Some components (e.g. FAQ drop downs) may be easier to target than others (e..g a list of features for a Software App).
Things to Check for each Highlight:
- If the content is present on-page, does the associated Highlight capture or target that content
- Is the content correctly being targeted?
In this example, I know that the Article has several images and a headline. I can use the Highlight Preview to see the images but the headline isn't showing a preview. To review mapping on the headline property, I would use the View JSON-LD page and test in the Schema Markup Validator.

What to do when the highlight does not map to content that exists on the page?
Not every page set will be perfectly templated. Sometimes, the content on the page that we’ve highlighted to define a property won’t be in the exact same place page-to-page.
If this happens, DO NOT DELETE THE HIGHLIGHT. Instead, create a new highlight for the missing content. As you review additional URLs, the Schema App Highlighter will look at both spots for content to define a property. By creating another highlight, we’re building a cascading template that will be able to recognize when the information you want highlighted is contained in different places. You will however, need to confirm that the new highlights you created do not map to other unexpected pages on other URLs.
Was this article helpful?
That’s Great!
Thank you for your feedback
Sorry! We couldn't be helpful
Thank you for your feedback
Feedback sent
We appreciate your effort and will try to fix the article